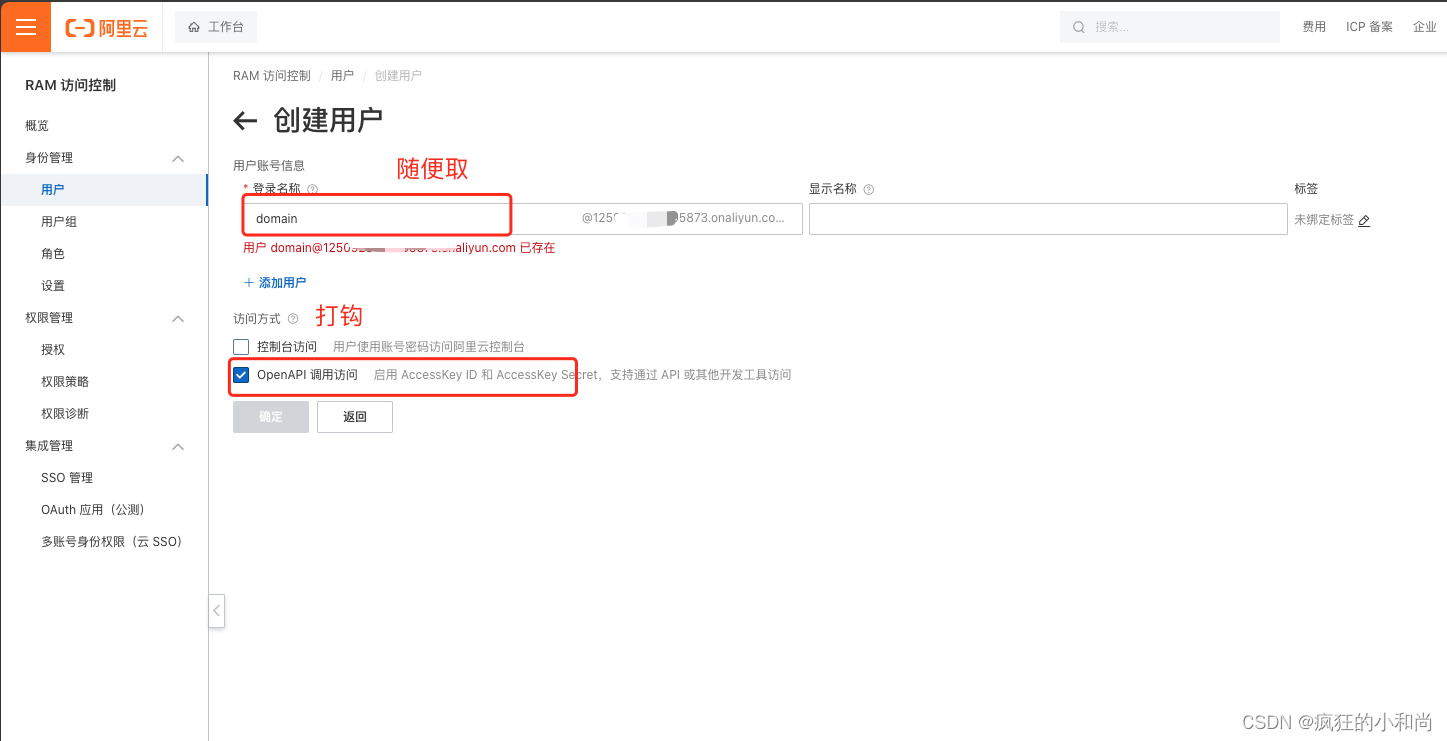
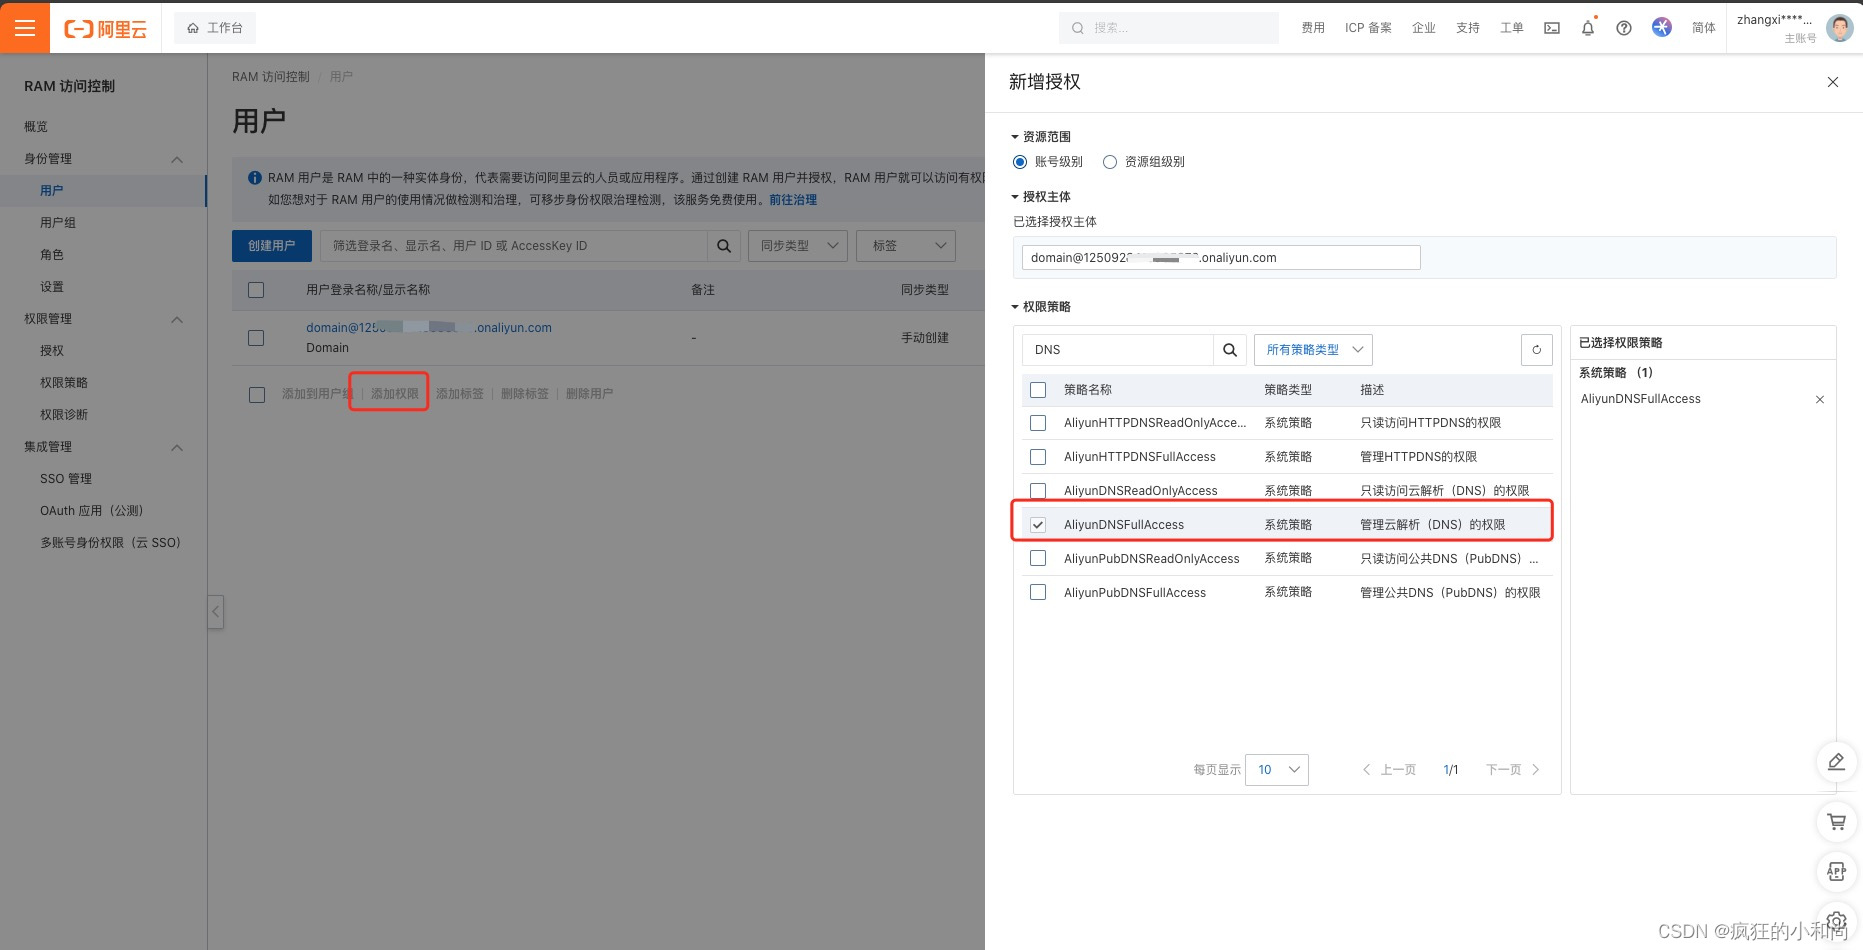
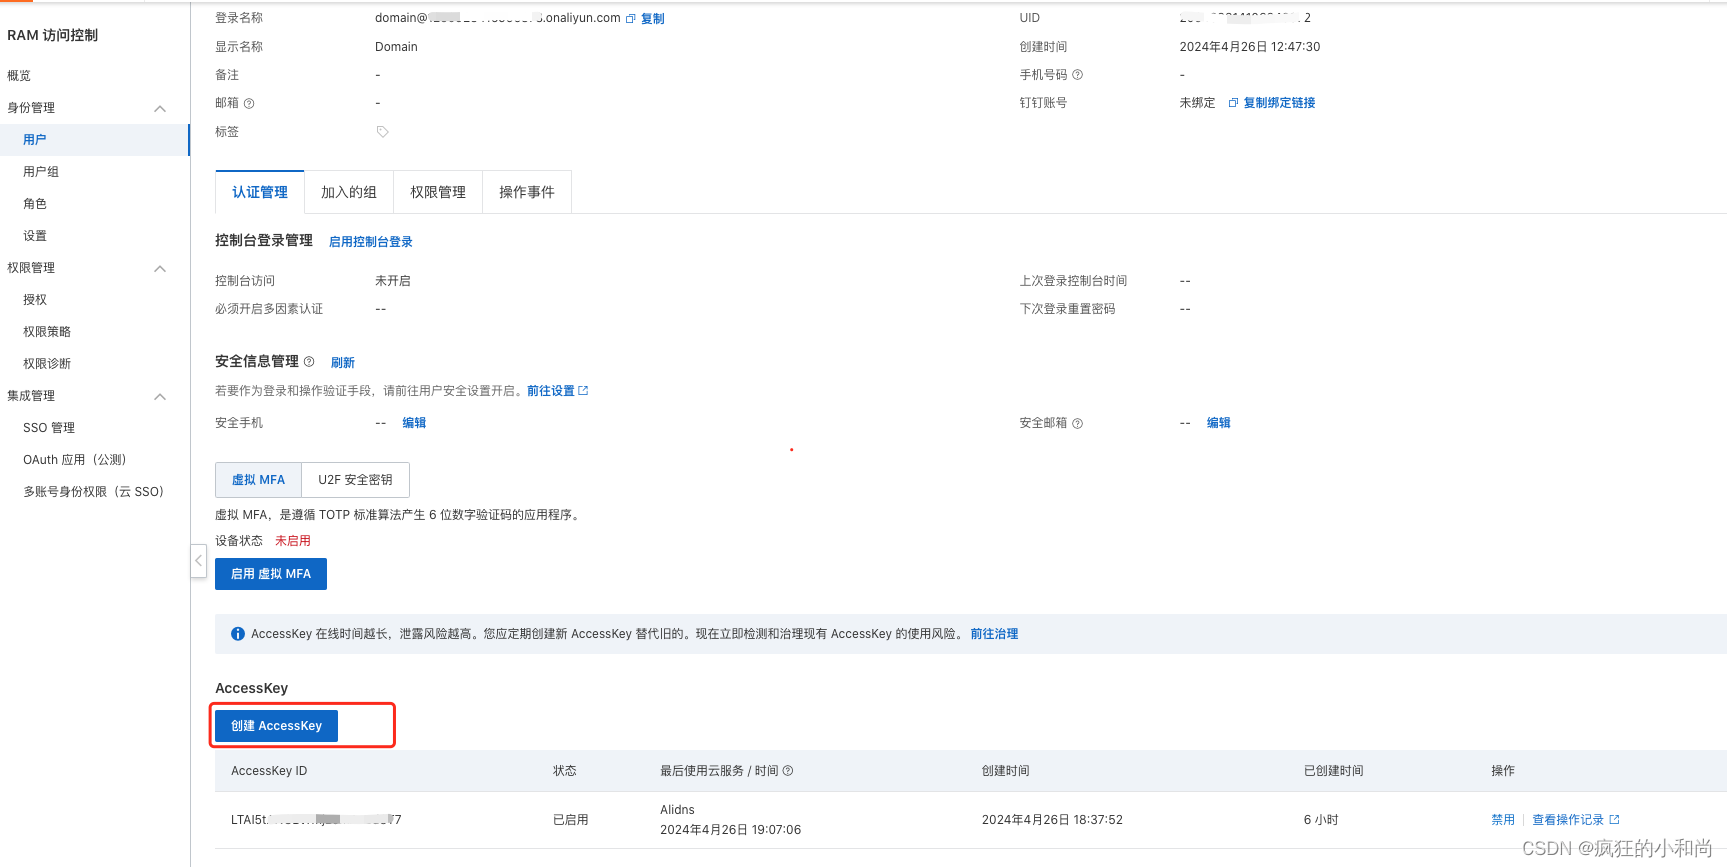
一、阿里云子账号授权
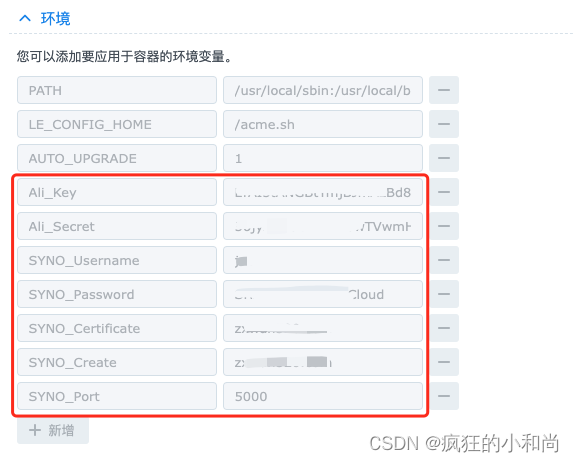
二、群晖创建acme.sh容器并配置环境
三、创建脚本文件
四、获取证书
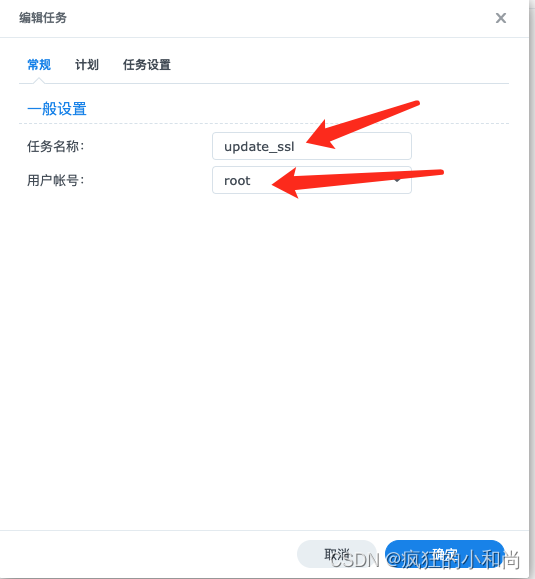
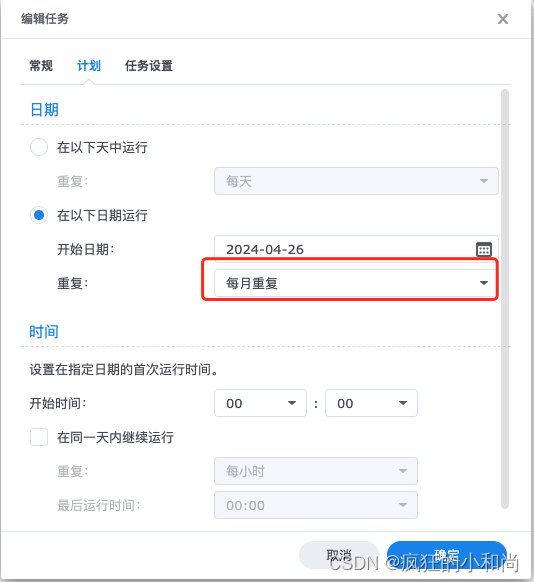
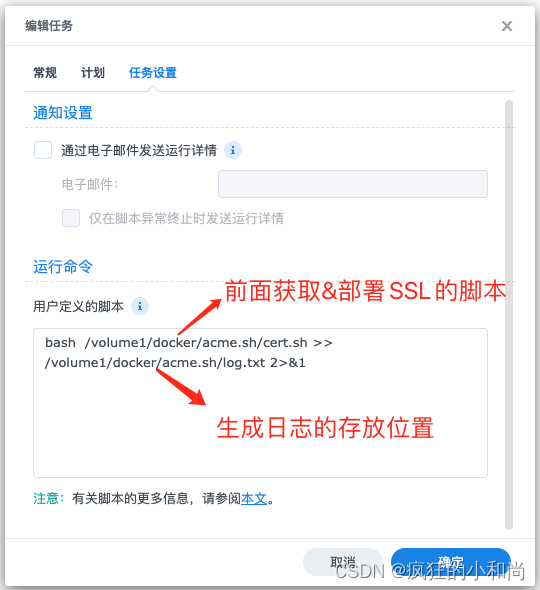
五、自动获取更新证书脚本
Cloudflare Domain API 提供两种自动颁发证书的方法:
(a) 创建具有特定权限的限制性 API 令牌;或
(b) 使用与您的 Cloudflare 帐户关联的全局 API 密钥,该密钥具有所有权限。
强烈建议不要使用方法 (b),因为全局 API 令牌的泄漏将完全危及您的账户,但如果发生这种情况,可以重置密钥。相比之下,建议使用方法 (a),因为如果限制性 API 令牌泄露,攻击面很小,可以简单地删除/撤销它,并且还可以随时通过您的 Cloudflare 配置文件设置更改其权限。
您需要创建一个 API 令牌,该令牌:
(i) 有权编辑单个特定 DNS 区域;或
(ii) 有权编辑多个 DNS 区域。
您可以通过 Cloudflare 个人资料页面的 API 令牌部分执行此操作。创建令牌时,在 Permissions(权限)下,选择 Zone (区域> DNS >编辑),然后在 Zone Resources(区域资源)下,仅包含您需要在其中执行 ACME DNS 质询的特定 DNS 区域。
API 令牌是一个 40 个字符的字符串,可以包含大写字母、小写字母、数字和下划线。您必须通过将环境变量设置为其值来将其提供给 acme.sh,例如 run 。CF_Tokenexport CF_Token="Y_jpG9AnfQmuX5Ss9M_qaNab6SQwme3HWXNDzRWs"
您必须向 acme.sh 提供它需要编辑的 DNS 区域的区域 ID。这是一个 32 个字符的十六进制字符串(例如 ),不应与区域名称(例如 )混淆。此区域 ID 可通过 Cloudflare 仪表板的右侧边栏中的“概述”页面上找到。763eac4f1bcebd8b5c95e9fc50d010b4example.com
您可以通过将环境变量设置为此区域 ID 来提供此信息,例如 run .CF_Zone_IDexport CF_Zone_ID="763eac4f1bcebd8b5c95e9fc50d010b4"
您必须向 acme.sh 提供相关 DNS 区域所属的 Cloudflare 帐户的帐户 ID。这是一个 32 个字符的十六进制字符串,不应与其他账户标识符混淆,例如账户电子邮件地址(例如 )或全局 API 密钥(也是一个 32 个字符的十六进制字符串)。此帐户 ID 可以通过 Cloudflare 仪表板找到,作为登录时 URL 的末尾,也可以在右侧边栏中区域 ID 下方的任何区域的概述页面上找到。alice@example.com
您可以通过将环境变量设置为此帐户 ID 来提供此信息,例如 run .CF_Account_IDexport CF_Account_ID="763eac4f1bcebd8b5c95e9fc50d010b4"
您可以从 Cloudflare 个人资料页面的 API tokens 部分下获取您的全球 API 密钥。点击 Global API key 旁边的 “View”(查看),验证您的 Cloudflare 密码,它就会显示给您。它是一个 32 个字符的十六进制字符串,您必须通过将环境变量设置为其值来提供给 acme.sh。您还必须设置为与您的 Cloudflare 帐户关联的电子邮件地址;这是您在登录 Cloudflare 时输入的电子邮件地址。例如:CF_KeyCF_Email
export CF_Key="763eac4f1bcebd8b5c95e9fc50d010b4"export CF_Email="alice@example.com"好了,现在让我们颁发一个证书:
./acme.sh --issue --dns dns_cf -d example.com -d '*.example.com'颁发证书时设置和使用的任何环境变量都将被保存,以便将来在颁发新证书或使用 .~/.acme.sh/account.confdns_cf
DNSPod.cn 域 API 选项要求您首先登录账户以获取 DNSPod API 密钥和 ID。
DNSPod API 密钥是指 https://dnspod.cn 上“我的账户设置”下找到的密钥。
DNSPod TokenAPI Keys
export DP_Id=<id>export DP_Key=<key>好了,现在让我们颁发一个证书:
./acme.sh --issue --dns dns_dp -d example.com -d *.example.com和 将保存在 中,并在需要时重复使用。DP_IdDP_Key~/.acme.sh/account.conf
删除
仅当您拥有超过 10 个域名或 Discount Domain Club 订阅时才有可能!请参阅 Reddit
首先,您需要登录您的 GoDaddy 账户以获取您的 API 密钥和密钥。
https://developer.godaddy.com/keys/
请创建一个 Production key,而不是 Test key。
export GD_Key="<key>"export GD_Secret="<secret>"好了,现在让我们颁发一个证书:
./acme.sh --issue --dns dns_gd -d example.com -d *.example.com和 将保存在 中,并在需要时重复使用。GD_KeyGD_Secret~/.acme.sh/account.conf
首先,您需要登录您的 PowerDNS 帐户以启用 API 并在配置中设置您的 API-Token。
https://doc.powerdns.com/md/httpapi/README/
export PDNS_Url="http://ns.example.com:8081"export PDNS_ServerId="localhost"export PDNS_Token="0123456789ABCDEF"export PDNS_Ttl=60好了,现在让我们颁发一个证书:
./acme.sh --issue --dns dns_pdns -d example.com -d *.example.com、 、 和 将保存在 中,并在需要时重复使用。PDNS_UrlPDNS_ServerIdPDNS_TokenPDNS_Ttl~/.acme.sh/account.conf
ncupdate 是 RFC 2136 动态 DNS 更新客户端。手册页
首先,生成用于更新区域的密钥
b=$(dnssec-keygen -a hmac-sha512 -b 512 -n USER -K /tmp foo)cat > /etc/named/keys/update.key <<EOFkey "update" { algorithm hmac-sha512; secret "$(awk '/^Key/{print $2}' /tmp/$b.private)";};EOFrm -f /tmp/$b.{private,key}将此键包含在命名配置中
include "/etc/named/keys/update.key";接下来,配置您的区域以允许动态更新。
根据您的指定版本,请使用
zone "example.com" {    type master;
    allow-update { key "update"; };};
或
zone "example.com" {    type master;
    update-policy {
        grant update subdomain example.com.;
    };}
BIND 9.16.1-Ubuntu 20.04.3 LTS 说明
# dnssec-keygen no longer do tsig algorithm, so tsig-keygen (came with bind9)tsig-keygen -a hmac-sha512 acme | sudo tee /etc/bind/acme.key# as nsupdate need creation of *.jnl where zone file resides, read /var/log/syslog for error detailssudo chmod g+w /etc/bind# similar to above steps: include key, allow-update with key on target zone# echo 'include "/etc/bind/acme.key";' | sudo tee --append /etc/bind/named.conf.local最后,将 DNS 服务器和更新密钥提供给acme.sh
export NSUPDATE_SERVER="dns.example.com"export NSUPDATE_KEY="/path/to/your/nsupdate.key"和可选(取决于 DNS 服务器)
export NSUPDATE_ZONE="example.com"好了,现在让我们颁发一个证书:
./acme.sh --issue --dns dns_nsupdate -d example.com -d *.example.com、 和 设置将保存在 中,并在需要时重复使用。NSUPDATE_SERVERNSUPDATE_KEYNSUPDATE_ZONE~/.acme.sh/account.conf
在 https://api.luadns.com/settings 获取 API 令牌
export LUA_Key="<key>"export LUA_Email="youremail@example.com"要颁发证书:
./acme.sh --issue --dns dns_lua -d example.com -d *.example.com和 将保存在 中,并在需要时重复使用。LUA_KeyLUA_Email~/.acme.sh/account.conf
在 https://cp.dnsmadeeasy.com/account/info 获取您的 API 凭证
export ME_Key="<key>"export ME_Secret="<secret>"要颁发证书:
./acme.sh --issue --dns dns_me -d example.com -d *.example.com和 将保存在 中,并在需要时重复使用。ME_KeyME_Secret~/.acme.sh/account.conf
export AWS_ACCESS_KEY_ID="<key id>"export AWS_SECRET_ACCESS_KEY="<secret>"要颁发证书:
./acme.sh --issue --dns dns_aws -d example.com -d *.example.com如果收到错误,您可以在 API 请求之间添加休眠时间:AWS Route53 rate exceeded
export AWS_DNS_SLOWRATE=1 (sleep between API requests in seconds)和 将保存在 中,并在需要时重复使用。这将启用对 AWS 服务器的 API 请求之间的休眠。这将有助于缓解 AWS 速率限制AWS_ACCESS_KEY_IDAWS_SECRET_ACCESS_KEYAWS_DNS_SLOWRATE~/.acme.sh/account.confAWS_DNS_SLOWRATE
首先,您需要登录您的阿里云帐户以获取您的 RAM API 密钥。https://ram.console.aliyun.com/users
export Ali_Key="<key>"export Ali_Secret="<secret>"好了,现在让我们颁发一个证书:
./acme.sh --issue --dns dns_ali -d example.com -d *.example.com和 将保存在 中,并在需要时重复使用。Ali_KeyAli_Secret~/.acme.sh/account.conf
这仅适用于 ISPConfig 3.1(及更高版本)。
在 ISPConfig 控制面板中创建远程用户。远程用户必须至少有权访问 、 和 。DNS zone functionsDNS txt functionsClient functions
export ISPC_User="xxx"export ISPC_Password="xxx"export ISPC_Api="https://ispc.domain.tld:8080/remote/json.php"export ISPC_Api_Insecure=1如果您已在其他端口上安装 ISPConfig,请相应地更改 8080。 如果您的安装没有有效的 ssl 证书,请将 ISPC_Api_Insecure 设置为 1。如果您拥有有效的 ssl 证书,请将其更改为 0。
要颁发证书:
./acme.sh --issue --dns dns_ispconfig -d example.com -d *.example.com、 、 和 将保存在 中,并在需要时重复使用。ISPC_UserISPC_PasswordISPC_ApiISPC_Api_Insecure~/.acme.sh/account.conf
首先,您需要登录您的 Alwaysdata 帐户以获取您的 API 密钥。
export AD_API_KEY="<myalwaysdataapikey>"好了,现在让我们颁发一个证书:
./acme.sh --issue --dns dns_ad -d example.com -d *.example.com将保存并在需要时重复使用。AD_API_KEY~/.acme.sh/account.conf
Cloud Manager: https://cloud.linode.com/profile/tokens
First you need to login to your Linode account to get your API Key.
Click on "Add a Personal Access Token".
Give the new key a "Label" (we recommend ACME)
Give it Read/Write access to "Domains"
"Submit" and copy the new key into the command below.
LINODE_V4_API_KEY
export LINODE_V4_API_KEY="..."Due to the reload time of any changes in the DNS records, we have to use the option to wait at least 15 minutes for the changes to take effect.dnssleep
Ok, let's issue a cert now:
./acme.sh --issue --dns dns_linode_v4 -d example.com -d *.example.com --dnssleep 900The will be saved in and will be reused when needed.LINODE_V4_API_KEY~/.acme.sh/account.conf
FreeDNS does not provide an API to update DNS records (other than IPv4 and IPv6 dynamic DNS addresses). The acme.sh plugin therefore retrieves and updates domain TXT records by logging into the FreeDNS website to read the HTML and posting updates as HTTP. The plugin needs to know your userid and password for the FreeDNS website.
export FREEDNS_User="..."export FREEDNS_Password="..."You need only provide this the first time you run the acme.sh client with FreeDNS validation and then again whenever you change your password at the FreeDNS site. The acme.sh FreeDNS plugin does not store your userid or password but rather saves an authentication token returned by FreeDNS in and reuses that when needed.~/.acme.sh/account.conf
Now you can issue a certificate.
./acme.sh --issue --dns dns_freedns -d example.com -d *.example.comNote that you cannot use acme.sh automatic DNS validation for FreeDNS public domains or for a subdomain that you create under a FreeDNS public domain. You must own the top level domain in order to automatically validate with acme.sh at FreeDNS.
Report any bugs or issues here
You only need to set your cyon.ch login credentials. If you also have 2 Factor Authentication (OTP) enabled, you need to set your secret token too and have installed.oathtool
export CY_Username="your_cyon_username"export CY_Password="your_cyon_password"export CY_OTP_Secret="your_otp_secret" # Only required if using 2FATo issue a cert:
./acme.sh --issue --dns dns_cyon -d example.com -d *.example.comThe , and will be saved in and will be reused when needed.CY_UsernameCY_PasswordCY_OTP_Secret~/.acme.sh/account.conf
Removed
See 60. Use do.de API instead
You must enable the new Gandi LiveDNS API first and then create your Personal Access Token (PAT) or api key (deprecated), See: https://api.gandi.net/docs/livedns/ and https://docs.gandi.net/en/managing_an_organization/organizations/personal_access_token.html
export GANDI_LIVEDNS_TOKEN="<key>"or (deprecated):
export GANDI_LIVEDNS_KEY="<key>"Ok, let's issue a cert now:
./acme.sh --issue --dns dns_gandi_livedns -d example.com -d *.example.comFirst, generate a TSIG key for updating the zone.
keymgr tsig generate -t acme_key hmac-sha512 > /etc/knot/acme.keyInclude this key in your knot configuration file.
include: /etc/knot/acme.keyNext, configure your zone to allow dynamic updates.
Dynamic updates for the zone are allowed via proper ACL rule with the action. For in-depth instructions, please see Knot DNS's documentation.update
acl:
  - id: acme_acl
    address: 192.168.1.0/24
    key: acme_key
    action: update

zone:
  - domain: example.com
    file: example.com.zone
    acl: acme_acl
Finally, make the DNS server and TSIG Key available to acme.sh
export KNOT_SERVER='dns.example.com'export KNOT_KEY='/etc/knot/acme.key'Ok, let's issue a cert now:
./acme.sh --issue --dns dns_knot -d example.com -d *.example.comThe and settings will be saved in and will be reused when needed.KNOT_SERVERKNOT_KEY~/.acme.sh/account.conf
You need to obtain a read and write capable API key from your DigitalOcean account. See: https://www.digitalocean.com/help/api/
export DO_API_KEY="<key>"Ok, let's issue a cert now:
./acme.sh --issue --dns dns_dgon -d example.com -d *.example.comYou need to set the HTTP API user ID and password credentials. See: https://www.cloudns.net/wiki/article/42/. For security reasons, it's recommended to use a sub user ID that only has access to the necessary zones, as a regular API user has access to your entire account.
# Use this for a sub auth IDexport CLOUDNS_SUB_AUTH_ID="<Auth ID>"# Use this for a regular auth ID#export CLOUDNS_AUTH_ID="Auth ID"export CLOUDNS_AUTH_PASSWORD="<password>"Ok, let's issue a cert now:
./acme.sh --issue --dns dns_cloudns -d example.com -d *.example.comThe and will be saved in and will be reused when needed.CLOUDNS_AUTH_IDCLOUDNS_AUTH_PASSWORD~/.acme.sh/account.conf
First you need to create/obtain API credentials on your Infoblox appliance.
export Infoblox_Creds="username:password"export Infoblox_Server="ip or fqdn of infoblox appliance"Ok, let's issue a cert now:
./acme.sh --issue --dns dns_infoblox -d example.com -d *.example.comNote: This script will automatically create and delete the ephemeral txt record. The and will be saved in and will be reused when needed.Infoblox_CredsInfoblox_Server~/.acme.sh/account.conf
First you need to create/obtain API tokens on your settings panel.
export VSCALE_API_KEY="<api key>"Ok, let's issue a cert now:
./acme.sh --issue --dns dns_vscale -d example.com -d *.example.comFirst you need to create/obtain API credentials from your Dynu account. See: https://www.dynu.com/resources/api/documentation
export Dynu_ClientId="<client id>"export Dynu_Secret="<secret>"Ok, let's issue a cert now:
./acme.sh --issue --dns dns_dynu -d example.com -d *.example.comThe and will be saved in and will be reused when needed.Dynu_ClientIdDynu_Secret~/.acme.sh/account.conf
First you need to login to your DNSimple.com account and generate a new oauth token.
https://dnsimple.com/a/{your account id}/account/automation
Note: This is an account token and not a user token. The account token is needed to infer the used in requests.account_id
A user token will not be able to determine the correct account to use. You may check tokens at https://dnsimple.com/a//account/access_tokens
export DNSimple_OAUTH_TOKEN="<token>"To issue the cert just specify the API.dns_dnsimple
./acme.sh --issue --dns dns_dnsimple -d example.com -d *.example.comThe will be saved in and will be reused when needed.DNSimple_OAUTH_TOKEN~/.acme.sh/account.conf
Report any bugs or issues here
export NS1_Key="<key>"Ok, let's issue a cert now:
./acme.sh --issue --dns dns_nsone -d example.com -d *.example.comDuckDNS.org is a popular free DDNS provider. You can get your own subdomain like .mydomain.duckdns.org
To configure it visit the DuckDNS and get your API token:
export DuckDNS_Token="<token>"Ok, let's issue a cert now:
acme.sh --issue --dns dns_duckdns -d mydomain.duckdns.org
Create your API token here: https://www.name.com/account/settings/api
Note: should be your Name.com username and not the token name. If you accidentally run the script with the token name as the username see to fix the issueNamecom_Username~/.acme.sh/account.conf
export Namecom_Username="<youruser>"export Namecom_Token="<token>"And now you can issue certs with:
./acme.sh --issue --dns dns_namecom -d example.com -d *.example.comIf you had Two-step Authentication enabled, make sure to change your security setting, read this guide for help: Using API with Two-step Authentication
Report any bugs or issues here
First, login to your Dyn Managed DNS account: https://portal.dynect.net/login/
It is recommended to add a new user specific for API access.
The minimum "Zones & Records Permissions" required are:
RecordAdd
RecordUpdate
RecordDelete
RecordGet
ZoneGet
ZoneAddNode
ZoneRemoveNode
ZonePublish
Pass the API user credentials to the environment:
export DYN_Customer="<customer>"export DYN_Username="<apiuser>"export DYN_Password="<secret>"Ok, let's issue a cert now:
./acme.sh --issue --dns dns_dyn -d example.com -d *.example.comThe , and will be saved in and will be reused when needed.DYN_CustomerDYN_UsernameDYN_Password~/.acme.sh/account.conf
The Yandex DNS API is no longer supported.
pdd.yandex.ru API was discontinued and superseded by the Yandex 360 for Business DNS API.
How to use the Yandex 360 for Business DNS API
Hurricane Electric he.net doesn't have an API so just set your login credentials like so:
export HE_Username="<yourusername>"export HE_Password="<password>"Then you can issue your certificate:
./acme.sh --issue --dns dns_he -d example.com -d *.example.comThe and settings will be saved in and will be reused when needed.HE_UsernameHE_Password~/.acme.sh/account.conf
Report any bugs or issues here or to me@ondrejsimek.com.
UPD The UnoEuro is now Simply.com
INWX.de offers a xmlrpc api with your standard login credentials, set them like so:
export INWX_User="<yourusername>"export INWX_Password="<password>"Then you can issue your certificates with:
./acme.sh --issue --dns dns_inwx -d example.com -d *.example.comThe and settings will be saved in and will be reused when needed.INWX_UserINWX_Password~/.acme.sh/account.conf
If your account is secured by mobile tan you have also defined the shared secret.
export INWX_Shared_Secret="<shared secret>"You may need to re-enable the mobile tan to gain the shared secret.
Create a new user from the Servercow control center. Don't forget to activate DNS API for this user.
export SERVERCOW_API_Username="<username>"export SERVERCOW_API_Password="<password>"Now you cann issue a cert:
./acme.sh --issue --dns dns_servercow -d example.com -d *.example.comBoth, and will be saved in and will be reused when needed.SERVERCOW_API_UsernameSERVERCOW_API_Password~/.acme.sh/account.conf
You'll need to generate an API key at https://www.namesilo.com/account/api-manager Optionally you may restrict the access to an IP range there.
export Namesilo_Key="<key>"And now you can issue certs with:
./acme.sh --issue --dns dns_namesilo -d example.com -d *.example.com --dnssleep 900InternetX offers a xml api with your standard login credentials, set them like so:
export AUTODNS_USER="yourusername"export AUTODNS_PASSWORD="password"export AUTODNS_CONTEXT="context"Then you can issue your certificates with:
./acme.sh --issue --dns dns_autodns -d example.com -d *.example.comThe , and settings will be saved in and will be reused when needed.AUTODNS_USERAUTODNS_PASSWORDAUTODNS_CONTEXT~/.acme.sh/account.conf
You have three options with Azure DNS:
Create and use a Service Principal with client secrets (recommended)
Using a Managed Identity (has to run on a resource in Azure)
Use a provided Bearer token (advanced scenarios only, the Bearer token has a limited lifetime)
You have to create a service principal first. See: How to use Azure DNS
export AZUREDNS_SUBSCRIPTIONID="<SUBSCRIPTIONID>"export AZUREDNS_TENANTID="<TENANTID>"export AZUREDNS_APPID="<APPID>"export AZUREDNS_CLIENTSECRET="<CLIENTSECRET>"Then you can issue your certificates with:
./acme.sh --issue --dns dns_azure -d example.com -d *.example.comAZUREDNS_SUBSCRIPTIONID, , and settings will be saved in and will be reused when needed.AZUREDNS_TENANTIDAZUREDNS_APPIDAZUREDNS_CLIENTSECRET~/.acme.sh/account.conf
You have to assign a managed identity to your resource, usually a VM, as described here. This identity requires DNS Zone Contributor role.
Before running acme.sh following variables need to be set: export AZUREDNS_SUBSCRIPTIONID="12345678-9abc-def0-1234-567890abcdef" export AZUREDNS_MANAGEDIDENTITY=true
Issuing certificates using managed identity clears previously set settings: , , . and will be saved in ~/.acme.sh/account.conf for future use.AZUREDNS_TENANTIDAZUREDNS_APPIDAZUREDNS_CLIENTSECRETAZUREDNS_SUBSCRIPTIONIDAZUREDNS_MANAGEDIDENTITY
If you want to use Entra Workload ID in a GitHub Action or similar CI/CD scenarios, you have to use a provided Bearer token.
The identity has to have Azure RBAC to be able to add and delete TXT records in the Azure DNS zone.
You need to extract the token earlier in your CI/CD, for example with this command:
az account get-access-token --query accessToken --output tsvAnd then pass it to acme.sh with the environment variable :AZUREDNS_BEARERTOKEN
export AZUREDNS_BEARERTOKEN="<BEARER TOKEN>"Finally, you need to set the tenant ID and subscription ID in the environment variables and :AZUREDNS_TENANTIDAZUREDNS_SUBSCRIPTIONID
export AZUREDNS_SUBSCRIPTIONID="<SUBSCRIPTIONID>"export AZUREDNS_TENANTID="<TENANTID>"Then you can issue the certificate with acme.sh, for example:
./acme.sh --issue --dns dns_azure -d example.com -d *.example.comFirst you need to login to your account to get your API key from: https://my.selectel.ru/profile/apikeys.
export SL_Key="<key>"Ok, let's issue a cert now:
./acme.sh --issue --dns dns_selectel -d example.com -d *.example.comThe will be saved in and will be reused when needed.SL_Key~/.acme.sh/account.conf
First you need to login to your account to find your API key from: http://zonomi.com/app/dns/dyndns.jsp
Your will find your api key in the example urls:
https://zonomi.com/app/dns/dyndns.jsp?host=example.com&api_key=1063364558943540954358668888888888export ZM_Key="<key>"Ok, let's issue a cert now:
./acme.sh --issue --dns dns_zonomi -d example.com -d *.example.comThe will be saved in and will be reused when needed.ZM_Key~/.acme.sh/account.conf
DNS API keys may be created at https://panel.dreamhost.com/?tree=home.api. Ensure the created key has and privileges.addremove
export DH_API_KEY="<api key>"./acme.sh --issue --dns dns_dreamhost -d example.com -d *.example.comThe will be saved in and will be reused when needed.DH_API_KEY~/.acme.sh/account.conf
The DirectAdmin interface has its own Let's encrypt functionality, but this script can be used to generate certificates for names which are not hosted on DirectAdmin.
User must provide login data and URL to the DirectAdmin incl. port. You can create a user which only has access to
CMD_API_DNS_CONTROL
CMD_API_SHOW_DOMAINS
By using the Login Keys function. See also https://www.directadmin.com/api.php and https://www.directadmin.com/features.php?id=1298
export DA_Api="https://remoteUser:remotePassword@da.domain.tld:8443"export DA_Api_Insecure=1Set to 1 for insecure and 0 for secure -> difference is whether ssl cert is checked for validity (0) or whether it is just accepted (1)DA_Api_Insecure
Ok, let's issue a cert now:
./acme.sh --issue --dns dns_da -d example.com -d *.example.comThe and will be saved in and will be reused when needed.DA_ApiDA_Api_Insecure~/.acme.sh/account.conf
API access must be enabled at https://painel.kinghost.com.br/painel.api.php
export KINGHOST_Username="yourusername"export KINGHOST_Password="yourpassword"./acme.sh --issue --dns dns_kinghost -d example.com -d *.example.comThe and will be saved in and will be reused when needed.KINGHOST_usernameKINGHOST_Password~/.acme.sh/account.conf
首先,在 https://my.zilore.com/account/api 获取 API 密钥
export Zilore_Key="<key>"好了,现在让我们颁发一个证书:
./acme.sh --issue --dns dns_zilore -d example.com -d *.example.com将保存并在需要时重复使用。Zilore_Key~/.acme.sh/account.conf
用户必须向 Loopia API 提供登录凭证。 用户需要以下权限:
获取域
getSubdomains
addSubdomain
removeSubdomain 删除子域
getZoneRecords
addZoneRecord
设置 API 端点:
export LOOPIA_Api="https://api.loopia.<TLD>/RPCSERV"根据您的托管位置,是以下之一: , , , .默认端点为 TLD。<TLD>comnorssese
设置登录凭证:
export LOOPIA_User="user@loopiaapi"export LOOPIA_Password="password"要颁发证书运行:
./acme.sh --issue --dns dns_loopia -d example.com -d *.example.com导出的变量将被保存在 中,并在需要时重复使用。~/.acme.sh/account.conf
ACME DNS 是一个具有 RESTful HTTP API 的有限 DNS 服务器,可轻松安全地处理 ACME DNS 挑战。https://github.com/joohoi/acme-dns
# Usage:# export ACMEDNS_BASE_URL="https://auth.acme-dns.io"## You can optionally define an already existing account:## export ACMEDNS_USERNAME="<username>"# export ACMEDNS_PASSWORD="<password>"# export ACMEDNS_SUBDOMAIN="<subdomain>"./acme.sh --issue --dns dns_acmedns -d example.com -d *.example.com凭证将被保存在 中,并在需要时重复使用。~/.acme.sh/account.conf
注意: 还有另一个 acme-dns 客户端,它不仅仅是 shell,而是使用单个证书支持多域和多 acme-dns 服务器。 如果 Python 对 acme.sh 设置没有问题,请查看 https://github.com/maddes-b/acme-dns-client-2
首先,您需要登录您的 TELE3 帐户以设置您的 API-KEY。https://www.tele3.cz/system-acme-api.html
export TELE3_Key="<key>"export TELE3_Secret="<secret>"./acme.sh --issue --dns dns_tele3 -d example.com -d *.example.comTELE3_Key 和 TELE3_Secret 将被保存并在需要时重复使用。~/.acme.sh/account.conf
首先,您需要登录您的 euserv.eu 帐户并激活您的 API 管理 (API Verwaltung)。https://support.euserv.com
激活后,登录您的 API 管理界面并创建一个 API 帐户。 请指定范围 (活动组:域) 并分配允许的 IP。
export EUSERV_Username="99999.user123"export EUSERV_Password="<password>"好了,现在让我们颁发一个证书:(请注意使用该标志,因为 euserv.eu 仍在使用自签名证书!--insecure
./acme.sh --issue --dns dns_euserv -d example.com -d *.example.com --insecure和 将保存在 中,并在需要时重复使用。EUSERV_UsernameEUSERV_Password~/.acme.sh/account.conf
向 github@initit.de 报告任何错误或问题
首先,您需要通过此 get-the-user-token 获取 API 密钥和 ID。
export DPI_Id="<id>"export DPI_Key="<key>"好了,现在让我们颁发一个证书:
./acme.sh --issue --dns dns_dpi -d example.com -d *.example.com和 将保存在 中,并在需要时重复使用。DPI_IdDPI_Key~/.acme.sh/account.conf
首先,您需要向 gcloud 进行身份验证。
gcloud init
dns_gcloud 脚本使用有效的 gcloud 配置和凭据。内部没有用于覆盖项目和其他设置的逻辑。 如果需要,请创建其他 gcloud 配置。 您可以更改正在使用的配置,而无需激活它;只需设置 Environment Variable(环境变量)。dns_gcloudCLOUDSDK_ACTIVE_CONFIG_NAME
要颁发证书,您可以:
export CLOUDSDK_ACTIVE_CONFIG_NAME=default # see the note above./acme.sh --issue --dns dns_gcloud -d example.com -d *.example.comdns_gcloud还支持 DNS 别名模式。
首先,您需要登录您的 ConoHa 帐户以获取您的 API 凭据。
export CONOHA_Username="xxxxxx"export CONOHA_Password="xxxxxx"export CONOHA_TenantId="xxxxxx"export CONOHA_IdentityServiceApi="https://identity.xxxx.conoha.io/v2.0"要颁发证书:
./acme.sh --issue --dns dns_conoha -d example.com -d *.example.com、 、 和 将保存在 中,并在需要时重复使用。CONOHA_UsernameCONOHA_PasswordCONOHA_TenantIdCONOHA_IdentityServiceApi~/.acme.sh/account.conf
首先,您需要登录您的 CCP 帐户以获取您的 API 密钥和 API 密码。
export NC_Apikey="<Apikey>"export NC_Apipw="<Apipassword>"export NC_CID="<Customernumber>"现在,让我们颁发一个证书:
./acme.sh --issue --dns dns_netcup -d example.com -d *.example.comThe , and will be saved in and will be reused when needed.NC_ApikeyNC_ApipwNC_CID~/.acme.sh/account.conf
You will need your namecheap username, API KEY (https://www.namecheap.com/support/api/intro.aspx) and your external IP address (or a URL to get it), this IP will need to be whitelisted at Namecheap. Due to Namecheap's API limitation all the records of your domain will be read and re applied, make sure to have a backup of your records you could apply if any issue would arise.
export NAMECHEAP_USERNAME="..."export NAMECHEAP_API_KEY="..."export NAMECHEAP_SOURCEIP="..."The can either be an IP address or a URL to provide it (e.g. https://ifconfig.co/ip).NAMECHEAP_SOURCEIP
The username and password will be saved in and will be reused when needed.~/.acme.sh/account.conf
Now you can issue a certificate.
./acme.sh --issue --dns dns_namecheap -d example.com -d *.example.comReport any bugs or issues here
First, register to MyDNS.JP and get MasterID and Password.
export MYDNSJP_MasterID="<MasterID>"export MYDNSJP_Password="<Password>"To issue a certificate:
./acme.sh --issue --dns dns_mydnsjp -d example.com -d *.example.comThe and will be saved in and will be reused when needed.MYDNSJP_MasterIDMYDNSJP_Password~/.acme.sh/account.conf
Create an API key in your hosting.de account here: https://secure.hosting.de
The key needs the following rights:
DNS_ZONES_EDIT
DNS_ZONES_LIST
Set your API Key and endpoint:
export HOSTINGDE_APIKEY='xxx'export HOSTINGDE_ENDPOINT='https://secure.hosting.de'The plugin can also be used for the http.net API. http.net customers have to set endpoint to https://partner.http.net.
Ok, let's issue a cert now:
./acme.sh --issue --dns dns_hostingde -d example.com -d *.example.comThe hosting.de API key and endpoint will be saved in and will be reused when needed.~/.acme.sh/account.conf
Report any bugs or issues here
export NEODIGIT_API_TOKEN="<token>"好了,现在让我们颁发一个证书:
./acme.sh --issue --dns dns_neodigit -d example.com -d *.example.comNeodigit API 令牌将被保存并在需要时使用。~/.acme.sh/account.conf
在 Exoscale 账户部分创建 API 密钥和密钥
设置 API 和 secret 密钥:
export EXOSCALE_API_KEY='<api key>'export EXOSCALE_SECRET_KEY='<secret key>'现在,让我们颁发一个证书:
./acme.sh --issue --dns dns_exoscale -d example.com -d *.example.com和 将保存在 中,并在需要时重复使用。EXOSCALE_API_KEYEXOSCALE_SECRET_KEY~/.acme.sh/account.conf
登录 PointHQ 帐户管理并从该页面复制 API 密钥。
export PointHQ_Key="apikeystringgoeshere"
exportPointHQ_Email="accountemail@yourdomain.com"
然后,您可以使用以下方法颁发证书:
./acme.sh --issue --dns dns_pointhq -d example.com -d *.example.com
在此处报告任何错误或问题
在 Active24 帐户部分、https://faq.active24.com/cz/790131-REST-API-rozhran%C3%AD 文档中创建 API 令牌。
设置 API 令牌:
export ACTIVE24_Token='<token>'现在,让我们颁发一个证书,为传播新的 DNS 记录设置:dnssleep
./acme.sh --issue --dns dns_active24 -d example.com -d *.example.com --dnssleep 1000将保存并在需要时重复使用。ACTIVE24_Token~/.acme.sh/account.conf
在此处报告任何错误或问题
在您的 do.de 账户中创建 API 令牌 (在此处创建令牌 |文档)。
设置 API 令牌:
export DO_LETOKEN="<token>"要颁发证书,请运行:
./acme.sh --issue --dns dns_doapi -d example.com -d *.example.comAPI 令牌将保存在 API 中,并在需要时重复使用。~/.acme.sh/account.conf
在此处报告任何错误或问题
首先,您需要登录 Nexcess.net 客户端门户并生成新的 API 令牌。
获得令牌后,在系统环境中设置它:
export NW_API_TOKEN="YOUR_TOKEN_HERE"export NW_API_ENDPOINT="https://portal.nexcess.net"最后,我们将颁发证书:(Nexcess DNS 最多每 15 分钟发布一次,我们建议设置 900 秒--dnssleep)
./acme.sh --issue --dns dns_nw -d example.com -d *.example.com --dnssleep 900The and will be saved in and will be reused when needed.NW_API_TOKENNW_API_ENDPOINT~/.acme.sh/account.conf
Report any bugs or issues here
First, you'll need to login to the Thermo.io Client Portal and generate a new API token.
Once you have a token, set it in your system's environment:
export NW_API_TOKEN="YOUR_TOKEN_HERE"export NW_API_ENDPOINT="https://core.thermo.io"Finally, we'll issue the certificate: (Thermo DNS publishes at max every 15 minutes, we recommend setting a 900 second --dnssleep)
./acme.sh --issue --dns dns_nw -d example.com -d *.example.com --dnssleep 900和 将保存在 中,并在需要时重复使用。NW_API_TOKENNW_API_ENDPOINT~/.acme.sh/account.conf
在此处报告任何错误或问题
首先,您需要登录 Futurehosting 客户端门户并生成新的 API 令牌。
获得令牌后,在系统环境中设置它:
export NW_API_TOKEN="<YOUR_TOKEN_HERE>"export NW_API_ENDPOINT="https://my.futurehosting.com"最后,我们将颁发证书:(Futurehosting DNS 最多每 15 分钟发布一次,我们建议设置 900 秒--dnssleep)
./acme.sh --issue --dns dns_nw -d example.com -d *.example.com --dnssleep 900和 将保存在 中,并在需要时重复使用。NW_API_TOKENNW_API_ENDPOINT~/.acme.sh/account.conf
在此处报告任何错误或问题
设置用户名和API密钥,可在“我的个人资料和设置”下找到。
export RACKSPACE_Username="<username>"export RACKSPACE_Apikey="<key>"现在,让我们颁发一个证书:
./acme.sh --issue --dns dns_rackspace -d example.com -d *.example.com在此处报告任何错误或问题
注意:online.net 已重命名为 scaleway.com 并且与 one.com 相同
首先,您需要检索 online.net API 密钥,该密钥位于 https://console.online.net/en/api/access
export ONLINE_API_KEY='<key>'要颁发证书运行:
./acme.sh --issue --dns dns_online -d example.com -d *.example.comONLINE_API_KEY将保存并在需要时重复使用。~/.acme.sh/account.conf
在此处报告任何错误或问题
确保您可以执行自己的二进制文件:
devil binexec on安装 acme.sh,或者简单地将其安装到您的 MyDevil 主机帐户上的某个目录中 (在这种情况下,您应该从您的目录中链接到它)。git clone~/bin
如果您不使用私有 IP 并依赖 host 提供的默认 IP,您可能还需要编辑, 并确保它在重启后也运行(您可以在他们的 wiki 页面上了解如何操作)。crontabacme.sh --cron
要颁发新证书,请运行:
./acme.sh --issue --dns dns_mydevil -d example.com -d *.example.com证书准备好后,您可以使用 deploy 命令进行安装。
在此处报告任何错误或问题
首先,您需要登录您的 Core-Networks.de 帐户以设置 API 用户。 然后导出用户名和密码以使用这些凭据。
export CN_User="<user>"export CN_Password="<password>"Ok, let's issue a cert now:
./acme.sh --issue --dns dns_cn -d example.com -d *.example.comThe and will be saved in and will be reused when needed.CN_UserCN_Password~/.acme.sh/account.conf
Report any bugs or issues here
Create an API token in Mijn NederHost.
Set your API key:
export NederHost_Key='xxx'To issue a certificate run:
./acme.sh --issue --dns dns_nederhost -d example.com -d *.example.comReport any bugs or issues here
首先,您需要检索 API 密钥。爱沙尼亚语 Instructions https://help.zone.eu/kb/zoneid-api-v2/
export ZONE_Username=yourusernameexport ZONE_Key=keygoeshere要颁发证书运行:
./acme.sh --issue --dns dns_zone -d example.com -d *.example.comZONE_Username,并将保存并在需要时重复使用。ZONE_Key~/.acme.sh/account.conf
在此处报告任何错误或问题
UltraDNS 是一项付费服务,提供 DNS 以及 Web 和邮件转发(以及报告、审计和高级工具)。
更多信息可在此处找到:https://www.security.neustar/lp/ultra20/index.html
此服务的 REST API 文档位于以下位置:https://portal.ultradns.com/static/docs/REST-API_User_Guide.pdf
设置您的 UltraDNS 用户名和密码;这些与您在此处使用的相同:
https://portal.ultradns.com/ - 或者如果您创建一个仅限 API 的用户,则最好使用该用户名和密码。
export ULTRA_USR="<username>"export ULTRA_PWD="<password>"要颁发证书运行:
./acme.sh --issue --dns dns_ultra -d example.com -d *.example.comULTRA_USR,并将保存并在需要时重复使用。ULTRA_PWD~/.acme.sh/account.conf
在此处报告任何错误或问题
首先 https://desec.io 注册 deSEC.io dynDNS。
通过在 desec.io 上的账户生成 API 令牌(密码)来设置您的 API 令牌(密码)。 限制可以使用它的 IPv4 / IPv6 地址也是一个好主意。
export DEDYN_TOKEN="<token>"要颁发证书,请运行:
./acme.sh --issue --dns dns_desec -d foobar.dedyn.io -d *.foobar.dedyn.io在此处报告任何错误或问题
首先,您需要启用 API 访问并在 https://rcp.openprovider.eu/account/dashboard.php 上检索您的密码哈希
export OPENPROVIDER_USER="<username>"export OPENPROVIDER_PASSWORDHASH="<hash>"./acme.sh --issue --dns dns_openprovider -d example.com -d *.example.comOPENPROVIDER_USER,并将保存并在需要时重复使用。OPENPROVIDER_PASSWORDHASH~/.acme.sh/account.conf
在此处报告任何错误或问题
确保您已正确配置 MaraDNS 并为您的域设置区域文件。 请参阅 csv2(5)。
设置区域文件的路径,以及 duende 的 pid 文件的路径。 参见 duende(8) 或 )。 pid 文件用于要求 duende 在添加 DNS 记录后自动重新加载配置。ps -C duende o pid,cmd
export MARA_ZONE_FILE="/etc/maradns/db.domain.com"export MARA_DUENDE_PID_PATH="/run/maradns/etc_maradns_mararc.pid"确保 acme.sh 进程具有对区域文件的写入访问权限和对 pid 文件的读取访问权限。
颁发证书:
./acme.sh --issue --dns dns_maradns -d example.com -d *.example.comMARA_ZONE_FILE and will be saved in and will be reused when needed.MARA_DUENDE_PID_PATH~/.acme.sh/account.conf
Report any bugs or issues here
Get the API Token: Use dnsConsole to create your hetzner api token.
Issuing a certificate (using LetsEncrypt):
export HETZNER_Token="<token>" ./acme.sh --issue --dns dns_hetzner -d example.com -d *.example.com --server letsencryptReport any bugs or issues here
First create an account at https://ddnss.de. After that create a new host record. In the definition for the host make sure to set the checkbox for "Wildcard" and for "TXT".
Note your Api Key (aka "Update Key") displayed at ddnss.de and export in DDNSS_Token variable
export DDNSS_Token="<token>"**Note: Every Cert needs it own Update Key, if you already use the Update Key please generate a new one and export to DDNSS_Token before issue a new Cert. **
After that you can issue a new certificate:
./acme.sh --issue --dns dns_ddnss -d example.com -d *.example.com在此处报告任何错误或问题
您需要导出两个变量。脚本将自动编辑的 zonefile:
export Nsd_ZoneFile="/etc/nsd/zones/example.com.zone"以及通过脚本调用 nsd-control reload 命令的功能:
export Nsd_Command="/usr/local/bin/sign-and-update.sh example.com"或直接:
export Nsd_Command="sudo nsd-control reload example.com"变量按域保存,而不是按账户保存。
要颁发新证书,请运行:
./acme.sh --issue --dns dns_nsd -d example.com -d *.example.com在此处报告任何错误或问题







已有 6 位网友参与,快来吐槽:
发表评论